")
Tabla de contenido:
- Autor John Day day@howwhatproduce.com.
- Public 2024-01-30 08:43.
- Última modificación 2025-01-23 14:40.

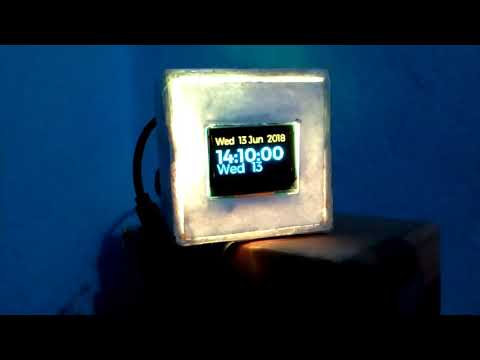

Este es un reloj inteligente que muestra el tiempo en una pantalla OLED y también puede escuchar el tiempo en diferentes intervalos de tiempo que es una ayuda completa para los ciegos y también cambia el color del LED con el tiempo, como la luz al anochecer, la luz de la noche se vuelve naranja a amarillo y me gusta. que. Este proyecto es muy emocionante, vamos a usar OLed con él y muy divertido con él.
Paso 1: MATERIALES QUE NECESITAMOS RECOGER


MATERIAL QUE PRIMERO NECESITAMOS RECOGER
- 2 cajas como en la foto o puede elegir según su elección
- Raspberry pi cualquier versión (he usado A +)
- Altavoz con amplificador
- Batería o mini banco de energía
- O pantalla LED (he usado OLED ssd1063)
- R. G. B led
- Pegamento y pegamento caliente
- Papel blanco de cartón o cualquier papel grueso.
Paso 2: SE NECESITA UN SOFTWARE
- Rasbiam o Noobs en Raspberry pi
- Biblioteca Python Gpio instalada en pi
- Biblioteca Python ssd oled
Instale el enlace Ssd OLed desde el enlace dado oled liberary link
github.com/adafruit/Adafruit_Python_SSD130…
Obtenga la fuente utilizada en el proyecto desde el siguiente enlace
github.com/xxlukas42/RPI_SSD1306
Paso 3: CONEXIÓN DE PIN Y FIJACIÓN DE PIEZAS DEL RELOJ


Coloque y fije la pantalla O. Led y el LED R. G. B en la caja como se ilustra en las fotos.
puede conectar y arreglar la pantalla Oled de acuerdo con su propio diseño
CONEXIÓN PIN DE EXPOSITOR O. LED DE FRAMBUESA
Pin de la placa Raspberry pi O.led Display
Pin3 -------------- ---------- - -> SDA
pin5 ----------------------------- SCL
TIERRA ---------------------------- TIERRA
3V -------------------------------- VCC
CONEXIÓN LED RGB a PI
comman + ve pin a 3v frambuesa pi
Rojo ------------- 35
Verde ----------- 33
Azul ------------- 37
Paso 4:
ENLACE DE CÓDIGO DE PYTHON
github.com/ASHWINISINHA/pi-oled-intelligen…
Descargue los scripts de Python desde el enlace anterior y ejecute el archivo run1.py desde Terminal para un reloj de color aleatorio
Ejecute run2.py desde la terminal para el color del LED según el tiempo
import timeimport os
tiempo de importación Adafruit_GPIO. SPI como SPI i
mport Adafruit_SSD1306 desde time import gmtime, strftime
de la imagen de importación PIL
desde PIL importar ImageDraw
desde PIL importar ImageFont
# Configuración de pines Raspberry Pi:
RST = 24 # Tenga en cuenta que lo siguiente solo se utiliza con
SPI: DC = 23 SPI_PORT = 0 SPI_DEVICE = 0
showtime = strftime ("% a% d% b% Y time% X second", gmtime ())
def femenino (texto):
os.system ("espeak '" + texto + "'")
hembra (showtime) # Pantalla de 128x32 con hardware I2C: #
disp = Adafruit_SSD1306. SSD1306_128_32 (rst = RST)
disp = Adafruit_SSD1306. SSD1306_128_64 (rst = RST) disp.begin ()
# Pantalla clara. disp.clear () disp.display ()
width = disp.width height = disp.height image = Image.new ('1', (ancho, alto))
# Obtener objeto de dibujo para dibujar en la imagen. dibujar = ImageDraw. Draw (imagen)
# Dibuja un cuadro relleno de negro para borrar la imagen. dibujar.rectángulo ((0, 0, ancho, alto), contorno = 0, relleno = 0)
# Dibuja algunas formas. # Primero defina algunas constantes para permitir un fácil cambio de tamaño de las formas. padding = 2 shape_width = 20 top = padding bottom = height-padding # Mover de izquierda a derecha manteniendo un registro de la posición x actual para dibujar formas. x = padding # Dibuja una elipse.
# Cargar fuente predeterminada. font = ImageFont.load_default () font = ImageFont.truetype ('Montserrat-Light.ttf', 14) font2 = ImageFont.truetype ('Montserrat-Light.ttf', 20) font_text_big = ImageFont.truetype ('Montserrat-Medium. ttf ', 30)
while True: draw.rectangle ((0, 0, width, height), outline = 0, fill = 0) draw.text ((x, top), str (strftime ("% a% d% b% Y", gmtime ())), font = font, fill = 455) draw.text ((x, top + 39), str (strftime ("% a% d", gmtime ())), font = font2, fill = 455) draw.text ((x, top + 12), str (strftime ("% X", gmtime ())), font = font_text_big, fill = 455) showtime = strftime ("% a% d% b% Y tiempo % X segundo ", gmtime ()) def female (text): os.system (" espeak '"+ text +"' ") female (showtime) disp.image (image) disp.display () time.sleep (1)
Descargue el script de Python completo desde aquí
github.com/ASHWINISINHA/pi-oled-intelligen…
github.com/ASHWINISINHA/pi-oled-intelligent-clock
Paso 5: Felicitaciones, su proyecto está listo ahora
Recomendado:
Reloj de jubilación / Cuenta ascendente / Reloj Dn: 4 pasos (con imágenes)
")
Reloj de jubilación / Count Up / Dn Clock: Tenía algunas de estas pantallas de matriz de puntos LED de 8x8 en el cajón y estaba pensando qué hacer con ellas. Inspirado por otros instructables, tuve la idea de construir una pantalla de cuenta regresiva / ascendente para contar regresivamente hasta una fecha / hora futura y si el tiempo objetivo p
Reloj despertador inteligente: un reloj despertador inteligente hecho con Raspberry Pi: 10 pasos (con imágenes)
")
Reloj despertador inteligente: un reloj despertador inteligente hecho con Raspberry Pi: ¿Alguna vez has querido un reloj inteligente? Si es así, ¡esta es la solución para usted! Hice Smart Alarm Clock, este es un reloj que puede cambiar la hora de la alarma de acuerdo con el sitio web. Cuando suene la alarma, habrá un sonido (zumbador) y 2 luces
Reloj Vortex: un reloj de pulsera con espejo infinito: 10 pasos (con imágenes)
")
Vortex Watch: un reloj de pulsera con espejo infinito: el objetivo de este proyecto era crear una versión portátil de un reloj con espejo infinito. Utiliza sus LED RGB para indicar el tiempo asignando horas, minutos y segundos a las luces roja, verde y azul respectivamente y superponiendo estos tonos t
Reloj de red ESP8266 sin ningún RTC - Reloj Nodemcu NTP Sin RTC - PROYECTO RELOJ DE INTERNET: 4 Pasos

Reloj de red ESP8266 sin ningún RTC | Reloj Nodemcu NTP Sin RTC | PROYECTO DE RELOJ DE INTERNET: En el proyecto se realizará un proyecto de reloj sin RTC, se tomará tiempo de Internet usando wifi y lo mostrará en la pantalla st7735
Tarjeta de identificación y usable inteligente Vea los latidos de su corazón Siéntelo: 5 pasos

Smart Wearable y tarjeta de identificación Vea los latidos de su corazón Siéntalo: SMART WEARABLE Es un dispositivo portátil inteligente basado en O.LED equipado con sensores que muestran los latidos de su corazón en vivo y un LED que se ilumina de acuerdo con los latidos de su corazón, lo que le brinda una nueva experiencia emocionante que realmente puede monitorear el latido de tu corazón y ver su trabajo