Tabla de contenido:
- Autor John Day day@howwhatproduce.com.
- Public 2024-01-30 08:44.
- Última modificación 2025-01-23 14:40.
Por jeffreyf Siga más por el autor:
Acerca de: Me gusta desarmar cosas y descubrir cómo funcionan. Generalmente pierdo interés después de eso. Más acerca de jeffreyf »
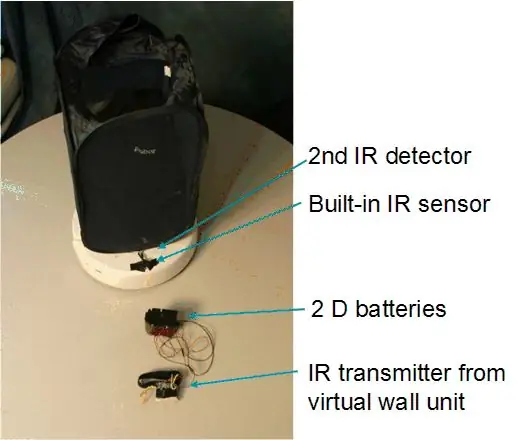
Este Instructable muestra cómo usar iRobot Create para hacer un botones en movimiento. Esto se eliminó por completo con el permiso de las instrucciones de carolDancer, y lo publiqué como una entrada de muestra para nuestro concurso. Robo-BellHop puede ser su propio asistente personal para llevar sus maletas, comestibles, lavandería, etc., para que usted no tenga para. El Create básico tiene un contenedor adjunto en la parte superior y utiliza dos detectores de infrarrojos integrados para seguir el transmisor de infrarrojos de su propietario. Con un código de software C muy básico, el usuario puede guardar alimentos pesados, una gran carga de ropa o su bolsa de viaje en Robo-BellHop y hacer que el robot lo siga por la calle, por el centro comercial, por el pasillo o por el aeropuerto. Operación básica 1) Presione el botón Restablecer para encender el módulo de comando y verificar que los sensores estén activados 1a) El LED de reproducción debe encenderse cuando vea que el transmisor de infrarrojos lo sigue 1b) El LED de avance debe encenderse cuando el el robot está muy cerca2) Presione el botón suave negro para ejecutar la rutina Robo-BellHop3) Conecte el transmisor de infrarrojos al tobillo y asegúrese de que esté encendido. ¡Luego cargue la canasta y listo! 4) La lógica de Robo-BellHop es la siguiente: 4a) Mientras camina, si se detecta la señal IR, el robot conducirá a la velocidad máxima 4b) Si la señal IR se apaga rango (al estar demasiado lejos o en un ángulo demasiado agudo), el robot recorrerá una distancia corta a baja velocidad en caso de que la señal sea captada nuevamente 4c) Si no se detecta la señal IR, el robot girará a la izquierda y a la derecha en un intentar encontrar la señal de nuevo 4d) Si se detecta la señal de infrarrojos pero el robot golpea un obstáculo, el robot intentará rodear el obstáculo 4e) Si el robot se acerca mucho a la señal de infrarrojos, el robot se detendrá para evitar golpear el tobillos del propietario Hardware1 Unidad de pared virtual iRobot - $ 301 detector de infrarrojos de RadioShack - $ 31 conector macho DB-9 de Radio Shack - $ 44 tornillos 6-32 de Home Depot - $ 2,502 baterías de 3V parte posterior del robot Create Cinta eléctrica, alambre y soldadura
Paso 1: cubrir el sensor de infrarrojos
Coloque cinta aislante para cubrir todo excepto una pequeña ranura del sensor de infrarrojos en la parte frontal del robot Create. Desmonte la unidad de pared virtual y extraiga la pequeña placa de circuito en la parte frontal de la unidad. Esto es un poco complicado porque hay muchos tornillos ocultos y soportes de plástico. El transmisor de infrarrojos está en la placa de circuito. Cubra el transmisor de infrarrojos con un trozo de papel de seda para evitar reflejos de infrarrojos. Fije la placa de circuito a una correa o banda elástica que pueda envolver su tobillo. Conecte las baterías a la placa de circuito para que pueda tener las baterías en un lugar cómodo (lo hice para poder poner las baterías en mi bolsillo).
Conecte el segundo detector de infrarrojos al conector DB-9 e insértelo en la clavija 3 (señal) y la clavija 5 (tierra) de Cargo Bay ePort. Coloque el segundo detector de infrarrojos en la parte superior del sensor de infrarrojos existente en Create y cúbralo con un par de capas de papel tisú hasta que el segundo detector de infrarrojos no vea el emisor a una distancia que desea que el robot de Create se detenga para mantener de golpearte. Puede probar esto después de presionar el botón Restablecer y ver que el LED de avance se enciende cuando se encuentra en la distancia de parada.
Paso 2: coloque la canasta
Fije la canasta con los tornillos 6-32. Acabo de montar la canasta en la parte superior del robot Create. También deslice la rueda trasera para colocar peso en la parte posterior del robot Create.
Notas: - El robot puede transportar bastante carga, al menos 30 libras. - El tamaño pequeño parecía ser la parte más difícil para llevar cualquier equipaje - IR es muy temperamental. Quizás usar imágenes sea mejor, pero es mucho más caro
Paso 3: descargue el código fuente
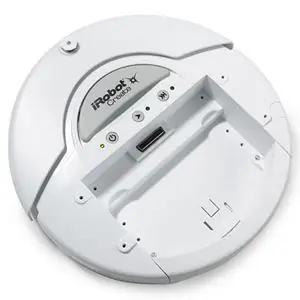
A continuación, se muestra el código fuente y se adjunta en un archivo de texto:
/ ********************************************** ******************** follow.c ** -------- ** se ejecuta en Create Command Module ** cubre casi todas las aberturas del frente excepto las pequeñas del sensor IR ** Create seguirá una pared virtual (o cualquier IR que envíe la ** señal de campo de fuerza) y, con suerte, evitará obstáculos en el proceso ***************** ************************************************ ** / # include interrupt.h> #include io.h> # include # include "oi.h" #define TRUE 1 # define FALSE 0 # define FullSpeed 0x7FFF # define SlowSpeed 0x0100 # define SearchSpeed 0x0100 # define ExtraAngle 10 # define SearchLeftAngle 125 # define SearchRightAngle (SearchLeftAngle - 1000) #define CoastDistance 150 # define TraceDistance 250 # define TraceAngle 30 # define BackDistance 25 # define IRDetected (~ PINB & 0x01) // estados # define Ready 0 # define Following 1 # define WasFollowing 2 #define SearchingLeft 3 # define SearchingRight 4 # define TracingLeft 5 # define TracingRight 6 # define BackingTraceLeft 7 # define BackingTraceRight 8 // Variables globalesv olatile uint16_t timer_cnt = 0; volátil uint8_t timer_on = 0; volátil uint8_t sensor_flag = 0; volátil uint8_t sensores_index = 0; volátil uint8_t sensores_ en [Sen6Size]; volátil uint8_t sensores [Sen6Size16_t distancia = int16_t; volátil volatile uint8_t inRange = 0; // Funcionesvoid byteTx (valor de uint8_t); void delayMs (uint16_t time_ms); void delayAndCheckIR (uint16_t time_ms); void delayAndUpdateSensors (unsigned int time_ms); void inicializar (voidOid); baud (uint8_t baud_code); void drive (int16_t velocidad, int16_t radio); uint16_t randomAngle (void); void defineSongs (void); int main (void) {// variable de estado uint8_t state = Ready; int found = 0; int wait_counter = 0; // Configurar Create y moduleinitialize (); LEDBothOff; powerOnRobot (); byteTx (CmdStart); baud (Baud28800); byteTx (CmdControl); byteTx (CmdFull); // establecer E / S para el segundo sensor IR DDRB & = ~ 0x01; // establece el pin 3 de ePort de la bahía de carga para que sea un inputPORTB | = 0x01; // establecer pullup cargo ePort pin3 habilitado // programar loop while (TRUE) {// detenerse solo como una unidad de precaución (0, RadStraight); // establecer LEDsbyteTx (CmdLeds); byteTx (((sensores [SenVWall])? LEDPlay: 0x00) | (inRange? LEDAdvance: 0x00)); byteTx (sensores [SenCharge1]); byteTx (64); IRDetected? LED2On: LED2Off; inRange? LED1On: LED1Off; // buscando el botón de usuario, verifique con frecuenciadelayAndUpdateSensors (10); delayAndCheck (10); if (UserButtonPressed) {delayAndUpdateSensors (1000); // bucle activo mientras (! (UserButtonPressed) && (! Sensores [SenCliffL]) && (! Sensores [SenCliffFL]) && (! Sensores [SenCliffFR]) && (! sensores [SenCliffR])) {byteTx (CmdLeds); byteTx (((sensores [SenVWall])? LEDPlay: 0x00) | (inRange? LEDAdvance: 0x00)); byteTx (sensores [SenCharge1]); byteTx (255); IRDetected ? LED2On: LED2Off; inRange? LED1On: LED1Off; switch (state) {case Ready: if (sensores [SenVWall]) {// verifica la proximidad al líderif (inRange) {drive (0, RadStraight);} else {// drive straightdrive (SlowSpeed, RadStraight); estado = Siguiendo;}} else {// busca el beamangle = 0; distancia = 0; espera_contador = 0; encontrado = FALSO; conducir (SearchSpeed, RadCCW); estado = SearchingLeft;} romper; caso Siguiente: if (sensores [SenBumpDrop] & BumpRight) {distancia = 0; ángulo = 0; conducir (-SlowSpeed, RadStraight); state = BackingTraceLeft;} else if (sensores [SenBumpDrop] & BumpLeft) {distancia = 0; ángulo = 0; conducir (-SlowSpeed, RadStraight); state = BackingTraceRight;} else if (sensores [SenVWall]) {// verificar proximidad a leaderif (inRange) {drive (0, RadStraight); state = Ready;} else {// drive straightdrive (FullSpeed, RadStraight); state = Following;}} else {// acaba de perder la señal, sigue avanzando lentamente uno cycledistance = 0; drive (SlowSpeed, RadStraight); state = WasFollowing;} break; case WasFollowing: if (sensores [SenBumpDrop] & BumpRight) {distancia = 0; ángulo = 0; drive (-SlowSpeed, RadStraight); estado = BackingTraceLeft;} else if (sensores [SenBumpDrop] & BumpLeft) {distancia = 0; ángulo = 0; conducir (-SlowSpeed, RadStraight); estado = BackingTraceRight;} else if (sensores [SenVWall]) {// comprobar la proximidad al líder si (inRange) {unidad (0, RadStraight); estado = R eady;} else {// conducir en línea recta (FullSpeed, RadStraight); estado = Siguiente;}} else if (distancia> = CoastDistance) {conducir (0, RadStraight); estado = Listo;} else {conducir (SlowSpeed, RadStraight);} break; case SearchingLeft: if (encontrado) {if (ángulo> = ExtraAngle) {drive (SlowSpeed, RadStraight); state = Following;} else {drive (SearchSpeed, RadCCW);}} else if (sensores [SenVWall]) {encontrado = TRUE; ángulo = 0; if (inRange) {drive (0, RadStraight); state = Ready;} else {drive (SearchSpeed, RadCCW);}} else if (angle> = SearchLeftAngle) {drive (SearchSpeed, RadCW); wait_counter = 0; state = SearchingRight;} else {drive (SearchSpeed, RadCCW);} break; case SearchingRight: if (encontrado) {if (-angle> = ExtraAngle) {drive (SlowSpeed, RadStraight); estado = Siguiendo;} else {unidad (Velocidad de búsqueda, RadCW);}} else if (sensores [SenVWall]) {encontrado = VERDADERO; ángulo = 0; if (inRange) {unidad (0, RadStraight); estado = Listo;} else {drive (SearchSpeed, RadCCW);}} else if (wait_counter> 0) {wait_counter - = 20; drive (0, RadStraight);} else if (angle = Search RightAngle) {drive (0, RadStraight); wait_counter = 5000; angle = 0;} else {drive (SearchSpeed, RadCW);} break; case TracingLeft: if (sensores [SenBumpDrop] & BumpRight) {distancia = 0; ángulo = 0; drive (-SlowSpeed, RadStraight); state = BackingTraceLeft;} else if (sensores [SenBumpDrop] & BumpLeft) {drive (0, RadStraight); state = Ready;} else if (sensores [SenVWall]) {// comprobar para la proximidad a leaderif (inRange) {drive (0, RadStraight); state = Ready;} else {// drive straightdrive (SlowSpeed, RadStraight); state = Following;}} else if (! (distancia> = TraceDistance)) { drive (SlowSpeed, RadStraight);} else if (! (- ángulo> = TraceAngle)) {drive (SearchSpeed, RadCW);} else {distancia = 0; ángulo = 0; drive (SlowSpeed, RadStraight); estado = Listo; } break; case TracingRight: if (sensores [SenBumpDrop] & BumpRight) {drive (0, RadStraight); state = Ready;} else if (sensores [SenBumpDrop] & BumpLeft) {distancia = 0; ángulo = 0; drive (- SlowSpeed, RadStraight); state = BackingTraceRight;} else if (sensores [SenVWall]) {// verifica la proximidad al líderif (inRang e) {drive (0, RadStraight); state = Ready;} else {// drive straightdrive (SlowSpeed, RadStraight); state = Following;}} else if (! (distance> = TraceDistance)) {drive (SlowSpeed, RadStraight);} else if (! (angle> = TraceAngle)) {drive (SearchSpeed, RadCCW);} else {distance = 0; angle = 0; drive (SlowSpeed, RadStraight); state = Ready;} break; case BackingTraceLeft: if (sensores [SenVWall] && inRange) {drive (0, RadStraight); state = Ready;} else if (angle> = TraceAngle) {distancia = 0; ángulo = 0; drive (SlowSpeed, RadStraight); state = TracingLeft; } else if (-distance> = BackDistance) {drive (SearchSpeed, RadCCW);} else {drive (-SlowSpeed, RadStraight);} break; case BackingTraceRight: if (sensores [SenVWall] && inRange) {drive (0, RadStraight); state = Ready;} else if (-angle> = TraceAngle) {distancia = 0; ángulo = 0; drive (SlowSpeed, RadStraight); state = TracingRight;} else if (-distance> = BackDistance) {drive (SearchSpeed, RadCW);} else {drive (-SlowSpeed, RadStraight);} break; predeterminado: // stopdrive (0, RadStraight); state = Re ady; break;} delayAndCheckIR (10); delayAndUpdateSensors (10);} // acantilado o botón de usuario detectado, permite que la condición se estabilice (p. ej., botón para soltar) drive (0, RadStraight); delayAndUpdateSensors (2000);}}} // Interrupción de recepción en serie para almacenar valores de sensor SIGNAL (SIG_USART_RECV) {uint8_t temp; temp = UDR0; if (sensor_flag) {sensores_in [sensor_index ++] = temp; if (sensor_index> = Sen6Size) sensor_flag = 0;}} // Temporizador 1 interrupción a retardos de tiempo en msSIGNAL (SIG_OUTPUT_COMPARE1A) {if (timer_cnt) timer_cnt -; elsetimer_on = 0;} // Transmitir un byte sobre el puerto serialvoid byteTx (valor de uint8_t) {while (! (UCSR0A & _BV (UDRE0))); UDR0 = value;} // Retraso por el tiempo especificado en ms sin actualizar los valores del sensorvoid delayMs (uint16_t time_ms) {timer_on = 1; timer_cnt = time_ms; while (timer_on);} // Retraso por el tiempo especificado en ms y verifique el segundo IR detectorvoid delayAndCheckIR (uint16_t time_ms) {uint8_t timer_val = 0; inRange = 0; timer_on = 1; timer_cnt = time_ms; while (timer_on) {if (! (Timer_val == timer_cnt)) {inRange + = IRDetected; timer_val = timer_cnt;}} inRange = (inRange> = (time_ms >> 1));} // Retraso por el tiempo especificado en ms y actualiza los valores del sensorvoid delayAndUpdateSensors (uint16_t time_ms) {uint8_t temp; timer_on = 1; timer_cnt = time_ms; while (timer_on) {if (! sensor_flag) {for (temp = 0; temp Sen6Size; temp ++) sensores [temp] = sensores_in [temp]; // Actualiza los totales acumulados de distancia y distancia angular + = (int) ((sensores [SenDist1] 8) | sensores [SenDist0]); ángulo + = (int) ((sensores [SenAng1] 8) | sensores [SenAng0]); byteTx (CmdSensors); byteTx (6); sensores_index = 0; sensores_flag = 1;}}} // Inicializar el control mental & aposs ATmega168 microcontrollervoid initialize (void) {cli (); // Establecer pines de E / S DDRB = 0x10; PORTB = 0xCF; DDRC = 0x00; PORTC = 0xFF; DDRD = 0xE6; PORTD = 0x7D; // Configurar el temporizador 1 para generar una interrupción cada 1 ms TCCR1A = 0x00; TCCR1B = (_BV (WGM12) | _BV (CS12)); OCR1A = 71; TIMSK1 = _BV (OCIE1A); // Configure el puerto serie con interrupción rxUBRR0 = 19; UCSR0B = (_BV (RXCIE0) | _BV (TXEN0) | _BV (RXEN0)); UCSR0C = (_BV (UCSZ00) | _BV (UCSZ01)); // Enciende interruptssei ();} void powerOnRobot (void) {// Si Create & aposs está apagado, enciéndelo si (! RobotIsOn) {while (! RobotIsOn) {RobotPwrToggleLow; delayMs (500); // Retraso en este estadoRobotPwrToggleHigh; // Transición de baja a alta para alternar powerdelayMs (100); // Retraso en este estadoRobotPwrToggleLow;} delayMs (3500); // Retraso para el inicio}} // Cambia la velocidad en baudios tanto en Create como en modulevoid baud (uint8_t baud_code) {if (baud_code = 11) {byteTx (CmdBaud); UCSR0A | = _BV (TXC0); byteTx (baud_code); / / Espere hasta que se complete la transmisión mientras (! (UCSR0A & _BV (TXC0))); cli (); // Cambie el registro de velocidad en baudios si (baud_code == Baud115200) UBRR0 = Ubrr115200; else if (baud_code == Baud57600) UBRR0 = Ubrr57600; else if (baud_code == Baud38400) UBRR0 = Ubrr38400; else if (baud_code == Baud28800) UBRR0 = Ubrr28800; else if (baud_code == Baud19200) UBRR0 = Ubrr19200; else if (baud_code == Baud14400) UBRr14400 = UBRR0; else if (baud_code == Baud9600) UBRR0 = Ubrr9600; else if (baud_code == Baud4800) UBRR0 = Ubrr4800; else if (baud_code == Baud2400) UBRR0 = Ubrr2400; else if (baud_code == Baud1200) UBRR0 = si no Ubrr baud_code == Baud600) UBRR0 = Ubrr600; else if (baud_code == Baud300) UBRR0 = Ubrr300; sei (); delayMs (100);}} // Enviar Crear comandos de unidad en términos de velocidad y radio de unidad (int16_t velocidad, int16_t radio) {byteTx (CmdDrive); byteTx ((uint 8_t) ((velocidad >> 8) & 0x00FF)); byteTx ((uint8_t) (velocidad & 0x00FF)); byteTx ((uint8_t) ((radio >> 8) & 0x00FF)); byteTx ((uint8_t) (radio & 0x00FF));}
Recomendado:
Bricolaje Cómo hacer un reloj de aspecto atractivo - StickC - Fácil de hacer: 8 pasos
DIY Cómo hacer un reloj de aspecto atractivo - StickC - Fácil de hacer: en este tutorial aprenderemos cómo programar ESP32 M5Stack StickC con Arduino IDE y Visuino para mostrar una hora en la pantalla LCD y también establecer la hora usando los botones StickC
Cómo hacer un dron usando Arduino UNO »Wiki Ùtil Hacer un cuadricóptero usando un microcontrolador: 8 pasos (con imágenes)
Cómo hacer un dron usando Arduino UNO »Wiki Ùtil Hacer un cuadricóptero usando un microcontrolador: Introducción Visite mi canal de Youtube Un dron es un dispositivo (producto) muy caro de comprar. En este post voy a discutir, ¿cómo lo hago a bajo precio? ¿Y cómo puedes hacer el tuyo así a un precio económico? Bueno, en la India todos los materiales (motores, ESC
[Robot Arduino] Cómo hacer un robot de captura de movimiento - Robot de pulgares - Servomotor - Código fuente: 26 pasos (con imágenes)
![[Robot Arduino] Cómo hacer un robot de captura de movimiento - Robot de pulgares - Servomotor - Código fuente: 26 pasos (con imágenes) [Robot Arduino] Cómo hacer un robot de captura de movimiento - Robot de pulgares - Servomotor - Código fuente: 26 pasos (con imágenes)](https://i.howwhatproduce.com/images/001/image-1599-93-j.webp)
[Robot Arduino] Cómo hacer un robot de captura de movimiento | Robot de pulgares | Servomotor | Código fuente: Thumbs Robot. Usó un potenciómetro del servomotor MG90S. ¡Es muy divertido y fácil! El código es muy simple. Son solo alrededor de 30 líneas. Parece una captura de movimiento. ¡Deje cualquier pregunta o comentario! [Instrucción] Código fuente https: //github.c
Luz reactiva a la música -- Cómo hacer una luz reactiva a la música súper simple para hacer que el escritorio sea impresionante: 5 pasos (con imágenes)

Luz reactiva de música || Cómo hacer luz reactiva de música súper simple para hacer un escritorio impresionante: Hola chicos, hoy construiremos un proyecto muy interesante. Hoy vamos a construir luz de música reactiva. el bajo, que en realidad es una señal de audio de baja frecuencia. Es muy simple de construir. Nosotros
Cómo hacer un robot de baloncesto autónomo usando un IRobot Create como base: 7 pasos (con imágenes)
Cómo hacer un robot autónomo para jugar al baloncesto usando un IRobot Create como base: Esta es mi entrada para el desafío de iRobot Create. La parte más difícil de todo este proceso para mí fue decidir qué iba a hacer el robot. Quería demostrar las características interesantes de Create, al mismo tiempo que agregué algo de estilo robo. Todo de mi
